I'm making heavy use of OpenLayers in my latest project and with this came the need for a wide range of map markers in terms of symbols and colors. Luckily there is the Map Icons Collection from Nicolas Mollet which provides an excellent set of markers sorted by various topics. You can even choose your own RGB colorization and download the markers for a single topic in a ZIP file.
This would have been sufficient if I were to use only a single color or a small set of colors for all my markers. But I wanted to be able to generate each marker with a specifyable color on the fly. So i downloaded all the markers as ZIPs with the color set to black (#000000, this is mandatory if you plan to duplicate my efforts) and the the iOS style applied (just a personal preference).
As I'm using Django to power my GIS web-application I wanted to have a view where I could specify the marker and it's color in the URL, so that I could use http://server/marker/star/ff0000 to get the start marker with a pure red (#ff0000) colorization. The colorization is done using PIL's ImageOps.colorize() function which calculates a color wedge that is then used to colorize a gray-scale image. The alpha channel of the original image is preserved and then reapplied to the newly colorized image.
The Django view looks like this:
def marker(request, marker, color):
    # open original image which serves as a staturation map
    image = Image.open(os.path.abspath(os.path.join(os.path.dirname(__file__),
        'static/marker/%s.png' % (marker))))
    # convert image to gray scale format
    saturation = image.convert('L')
    # apply colorization which yield a RBG image without an alpha channel
    marker = ImageOps.colorize(saturation, ImageColor.getrgb('#%s' % (color)), (255, 255, 255))
    # convert ba to RGBA so we can apply the original alpha channel in the next step
    marker = marker.convert('RGBA')
    # apply original alpha channel to colorized image
    marker.putalpha(image.split()[3])
    # construct HttpResponse and send to browser
    response = HttpResponse(content_type='image/png')
    marker.save(response, 'PNG')
    return response
In my production code I have also added caching to this view so that the whole image processing has to be done only once for each color/marker combination.
The accompaning URL mapping for the view is like this:
urlpatterns = patterns('views',
    url(r'^marker/(?P\w+)/(?P[0-9a-fA-F]{6})$', 'marker'),
)
I unpacked the downloaded ZIP archive into static/marker/ so they can be found on a path relativ to the views.py file where the marker view is defined.
That's it, I hope this helps some of the people out there who have more dynamic requirements on their markers regarding colorization.
At my office I make heavy use of Icinga checks which rely on SSH connections for gathering data from the customer's systems. SNMP was not an option as I have the requirement to execute small parts of logic on the monitored systems. So I ended up with more than 100 SSH logins on each monitored hosts due to the sheer amount of checks done on each one (albeit I use my own implementation of something similar to check_multi using memcached to reduce the number of real logins). This led to log file congestion and a substantial performance drain on our Icinga cluster due to the cost of setting up a new SSH connection for each single check.
As I use Net::OpenSSH for handling the SSH connections from inside our checks I wanted to go on step further: use SSH master/slave multiplexing to run all checks over a shared SSH connection.
The following Debian packages are used in this approach:
- openssh-client
- autossh
- supervisor
First, I created a SSH configuration file that defines the behavior of the master connection (located at /etc/icinga/ssh_config):
IdentityFile /etc/icinga/keys/ssh_key
ControlMaster yes
ControlPath /var/run/icinga/ssh.%r@%h.socket
BatchMode yes
CheckHostIP no
ControlPersist yes
LogLevel FATAL
PreferredAuthentications publickey
Protocol 2
RequestTTY auto
StrictHostKeyChecking no
ServerAliveInterval 60
ServerAliveCountMax 10
Some options like StrictHostKeyChecking were necessary because I also monitor clustered IPs which can migrate between two or more hosts with different host keys.
In the next step I set up supervisor to manage the SSH connections using autossh. I choose autossh as a wrapper around the ssh client because I need the SSH connection to be automatically reestablished once a host was down and comes back to life. supervisor comes in handy as an interface to manage all those autossh processes in a convenient way but can be substituted by your process manger of choice. All autossh processes have to be started by the user nagios because it's the one Icinga's checks are executed under and the socket created by the SSH master is only writable to the user who started the autossh process.
A sample supervisor configuration file (located in /etc/supervisor/conf.d/sample.conf) could look like this:
[program:customer1_cluster]
command = autossh -M 0 -N -T -F /etc/icinga/ssh_config 10.224.81.6
user = nagios
autorestart = true
stopsignal = INT
[program:customer1_node1]
command = autossh -M 0 -N -T -F /etc/icinga/ssh_config 10.224.81.7
user = nagios
autorestart = true
stopsignal = INT
[program:customer1_node2]
command = autossh -M 0 -N -T -F /etc/icinga/ssh_config 10.224.81.8
user = nagios
autorestart = true
stopsignal = INTTo get an already running supervisor instance to recognize this newly added file simply run:
supervisorctl reread; supervisorctl update
Now you should be able to see your running processes with:
supervisorctl status
Now there should be corresponding UNIX socket in /var/run/icinga for each autossh process.
The final step is to use Net::OpenSSH inside all checks and tell it to reuse the master SSH connection through the UNIx socket in /var/run/icinga. This is a simple example of setting up the SSH connection:
my $c = Net::OpenSSH->new($hostname, (
user => $username,
batch_mode => 1,
kill_ssh_on_timeout => 1,
external_master => 1,
ctl_path => "/var/run/icinga/ssh.".$username."@".$hostname.".socket",
));
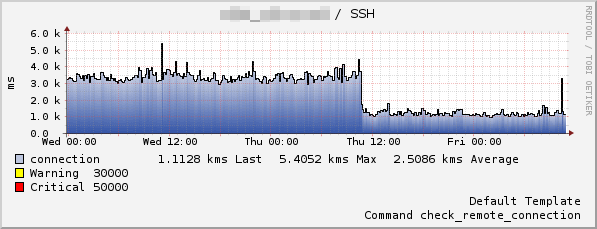
By using multiplexing I was able to reduce the time required for a single check by almost two thirds as the next graph shows. It shows the latency for a check without (~3.5sec) and with (~1.2sec) multiplexing enabled.
